ANGULAR JS (1)
AngularJS is a JavaScript framework i.e. used to create single web page application. It follows MVC (Model View Controller) pattern. It is open source, cross browser compliant and easy to maintain.
BOOTSTRAP (1)
Bootstrap is a sleek, intuitive, and powerful mobile first front-end framework for faster and easier web development. It uses HTML, CSS and Javascript.
CSS (1)
CSS stands for Cascading Style Sheets. It is a style sheet language which is used to describe the look and formatting of a document written in markup language. It provides an additional feature to HTML. It is generally used with HTML to change the style of web pages and user interfaces. It can also be used with any kind of XML documents including plain XML, SVG and XUL.
HTML (44)
HTML is an acronym which stands for Hyper Text Markup Language. Let’s see what is Hyper Text and what is Markup Language?
HTML elements communicate to the browser to render text. When the elements are surrounded by brackets <>, they form HTML tags. Most of the time, tags come in pair and surround content.
No, there are single HTML tags that do not need a closing tag. Examples are the tag and
tags.
You can insert any or a combination of the following list types:
– ordered list
– unordered list
– definition list
– menu list
– directory list
Each of this list types makes use of a different tag set to compose
Comments in HTML begins with “”. For example:
No, there are some character entities that cannot be displayed when the operating system that the browser is running on does not support the characters. When that happens, these characters are displayed as boxes.
Some attribute values can be set to only predefined values. Other attributes can accept any numerical value that represents the number of pixels for a size.
To insert the copyright symbol, you need to type © or & #169; in an HTML file.
Yes, older HTML files are compliant to the HTML standard. Most older files work on the newer browsers, though some features may not work.
No, hyperlinks can be used in the text as well as images. That means you can convert an image into a link that will allow users to link to another page when clicked. Surround the image within the … tag combinations.
In cases wherein their operating system does not support a particular character, it is still possible to display that character by showing it as an image instead.
The
To create text with different colors, use the … tags for every character that you want to apply color. You can use this tag combination as many times as needed, surrounding a single character or an entire word.
The numerical values are taken from the ASCII values for the various characters, but these can be difficult to remember. Because of this, named character entity values were created to make it easier for web page designers to use.
If two sets of HTML tags are overlapped, only the first tag will be recognized. You will find this problem when the text does not display properly on the browser screen.
Applets are small programs that can be embedded within web pages to perform some specific functionality, such as computations, animations, and information processing. Applets are written using the Java language.
If there is no text between the tags, then there is nothing to format. Therefore no formatting will appear. Some tags, especially tags without a closing tag like the tag, do not require any text between them.
You can specify a border color using style sheets, but the colors for a table that does not use style sheets will be the same as the text color.
To create hyperlinks, or links that connect to another web page, use the href tag. The general format for this is: text
Replace “site” with the actual page URL that is supposed to be linked to when the text is clicked.
Tables can be used to position text and images. Another useful way to wrap text around an image is to use style sheets.
The key difference is that the directory and menu lists do not include attributes for changing the bullet style.
The bullet color is always the same as that of the first character in the list item. If you surround the
The default size for a text field is around 13 characters. However, if you include the size attribute, you can set the size value to be as low as 1. The maximum size value will be determined by the browser width. If the size attribute is set to 0, the size will be set to the default size of 13 characters.
26) Do tags always need to come at the start of a row or column?Any
tag can be changed to a
tag. This causes the text contained within the
tag to be displayed as bold in the browser. Although
tags are mainly used for headings, they do not need to be used exclusively for headings.
A marquee allows you to put a scrolling text in a web page. To do this, place whatever text you want to appear scrolling within the tags.
Content is placed in between HTML tags in order to properly format it. It makes use of the less than symbol (<) and the greater than symbol (>). A slash symbol is also used as a closing tag.
No. The
tag is only one way to separate lines of text. Other tags, like the
tag and
tag, also separate sections of text.
The default color for normal and active links is blue. Some browsers recognize an active link when the mouse cursor is placed over that link; others recognize active links when the link has the focus. Those that don’t have a mouse cursor over that link is considered a normal link.
Style sheets do not limit the number of style definitions that can be included within the brackets for a given selector. Every new style definition, however, must be separated from the others by a semicolon symbol.
You can define several selectors with the same style definition by separating them with commas. This same technique also works for selectors with class names.
To do this, place a tag code after the tag
If the list-style-type property is used on a non-list element like a paragraph, the property will be ignored and do not affect the paragraph.
Frames can make navigating a site much easier. If the main links to the site are located in a frame that appears at the top or along the edge of the browser, the content for those links can be displayed in the remainder of the browser window.
The latest versions of Google Chrome, Apple Safari, Mozilla Firefox, and Opera all support most of the HTML5 features.
The
and
tags are two new tags that are included in HTML5. Articles can be composed of multiple sections that can have multiple articles. An article tag represents a full block of content which is a section of a bigger whole.
This tag represents a piece of self-contained flow content. It is mostly used as a single unit as a reference the main flow of the document.
The canvas element helps to build charts, graphs, bypass Photoshop to create 2D images and place them directly into HTML5 code.
The new Form elements in HTML5 offers much better functionality than the earlier versions.
The tags given provided to carry out these functions are:
1)
2) – This tag represents a key-pair generator field.
3)
Two main benefits of HTML5 Web Storage:
- It can store up to 10 MB data which is certainly more than what cookies have.
- Web storage data cannot be transferred with the HTTP request. It helps to increase the performance of the application.
Two storage types of HTML5 are:
Session Storage:
It stores data of current session only. It means that the data stored in session storage clear automatically when the browser is closed.
Local Storage:
Local storage is another type of HTML5 Web Storage. In local storage, data is not deleted automatically when the current browser window is closed.
The Application Cache concept means that a web application is cached. It can be accessible without the need for internet connection.
Some advantages of Application Cache:
- Offline browsing – Web users can also use the application when they are offline.
- Speed – Cached resources load quicker
- Reduce the server load – The web browser will only download updated resources from the server.
Following are the important, new data types offered by HTML5:
- Date: It allows the user to select a date.
- datetime-local: This input type allows the user to select a date and time without time zone.
- datetime: This input type allows the user to select a date and time with time zone.
- month: It enables the user to select a month and year
- email: These input fields used to contain an e-mail address.
JAVACSRIPT (1)
JavaScript Tutorial for beginners and professionals is a solution of client side dynamic pages.
JavaScript is an object-based scripting language that is lightweight and cross-platform.
JavaScript is not compiled but translated. The JavaScript Translator (embedded in browser) is responsible to translate the JavaScript code.
JQUERY (1)
jQuery is a fast, lightweight, feature-rich client side JavaScript framework. It has provided a much needed boost to JavaScript. Before jQuery, JavaScript codes were lengthy and bigger, even for smaller functionality.
MONGO DB (1)
Although MongoDB and MySQL both are free and open source databases, there is a lot of difference between them in the term of data representation, relationship, transaction, querying data, schema design and definition, performance speed, normalization and many more. To compare MySQL with MongoDB is like a comparison between Relational and Non-relational databases.
NODE JS (1)
Node.js is a server side scripting based on Google’s V8 JavaScript engine. It is used to build scalable programs especially web applications that are computationally simple but are frequently accessed.
PHP (1)
PHP is a server side scripting language commonly used for web applications. PHP has many frameworks and cms for creating websites.Even a non technical person can cretae sites using its CMS.WordPress,osCommerce are the famus CMS of php.It is also an object oriented programming language like java,C-sharp etc.It is very eazy for learning
REACT JS (26)
React is an open-source JAVASCRIPT library developed by Facebook Engineers for building complex and interactive User Interfaces in web & mobile applictions.
React is an open-source frontend JavaScript library which is used for building user interfaces especially for single page applications. It is used for handling view layer for web and mobile apps. React was created by Jordan Walke, a software engineer working for Facebook. React was first deployed on Facebook’s News Feed in 2011 and on Instagram in 2012.
- It uses VirtualDOM instead RealDOM considering that RealDOM manipulations are expensive.
- Supports server-side rendering.
- Follows Unidirectional* data flow or data binding.
- Uses reusable/composable UI components to develop the view.
JSX is a XML-like syntax extension to ECMAScript (the acronym stands for JavaScript XML). Basically it just provides syntactic sugar for the React.createElement() function, giving us expressiveness of JavaScript along with HTML like template syntax.
In the example below text inside ;
; tag return as JavaScript function to the render function.
class App extends React.Component {
render() {
return(
{‘Welcome to React world!’}
)
}
}
An Element is a plain object describing what you want to appear on the screen in terms of the DOM nodes or other components. Elements can contain other Elements in their props. Creating a React element is cheap. Once an element is created, it is never mutated.
The object representation of React Element would be as follows:
const element = React.createElement(
‘div’,
{id: ‘login-btn’},
‘Login’
)
The above React.createElement() function returns an object:
{
type: ‘div’,
props: {
children: ‘Login’,
id: ‘login-btn’
}
}
And finally it renders to the DOM using ReactDOM.render():
Login
Whereas a component can be declared in several different ways. It can be a class with a render() method. Alternatively, in simple cases, it can be defined as a function. In either case, it takes props as an input, and returns an JSX tree as the output:
const Button = ({ onLogin }) =>
Then JSX gets transpiled to React.createElement() function tree:
const Button = ({ onLogin }) => React.createElement(
‘div’,
{ id: ‘login-btn’, onClick: onLogin },
‘Login’
)
There are two possible ways to create a component.
1. Function Components: This is the simplest way to create a component. Those are pure JavaScript functions that accept props object as first parameter and return React elements:
2. function Greeting({ message }) {
3. return
{`Hello, ${message}`}
}
4. Class Components: You can also use ES6 class to define a component. The above function component can be written as:
5. class Greeting extends React.Component {
6. render() {
7. return
{`Hello, ${this.props.message}`}
8. }
If the component needs state or lifecycle methods then use class component otherwise use function component.
React.PureComponent is exactly the same as React.Component except that it handles the shouldComponentUpdate() method for you. When props or state changes, PureComponent will do a shallow comparison on both props and state. Component on the other hand won’t compare current props and state to next out of the box. Thus, the component will re-render by default whenever shouldComponentUpdate is called.
State of a component is an object that holds some information that may change over the lifetime of the component. We should always try to make our state as simple as possible and minimize the number of stateful components. Let’s create an user component with message state,
class User extends React.Component {
constructor(props) {
super(props)
this.state = {
message: ‘Welcome to React world’
}
}
render() {
return (
{this.state.message}
)
}
}
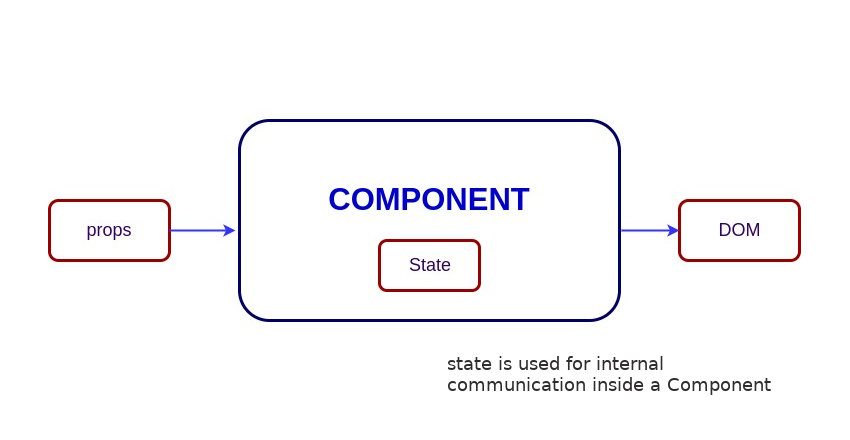
State is similar to props, but it is private and fully controlled by the component. i.e, It is not accessible to any component other than the one that owns and sets it.
Props are inputs to components. They are single values or objects containing a set of values that are passed to components on creation using a naming convention similar to HTML-tag attributes. They are data passed down from a parent component to a child component.
The primary purpose of props in React is to provide following component functionality:
- Pass custom data to your component.
- Trigger state changes.
- Use via this.props.reactProp inside component’s render() method.
For example, let us create an element with reactProp property:
This reactProp (or whatever you came up with) name then becomes a property attached to React’s native props object which originally already exists on all components created using React library.
props.reactProp
Both props and state are plain JavaScript objects. While both of them hold information that influences the output of render, they are different in their functionality with respect to component. Props get passed to the component similar to function parameters whereas state is managed within the component similar to variables declared within a function.
If you try to update state directly then it won’t re-render the component.
//Wrong
this.state.message = ‘Hello world’
Instead use setState() method. It schedules an update to a component’s state object. When state changes, the component responds by re-rendering.
//Correct
this.setState({ message: ‘Hello World’ })
Note: You can directly assign to the state object either in constructor or using latest javascript’s class field declaration syntax.
The callback function is invoked when setState finished and the component gets rendered. Since setState() is asynchronous the callback function is used for any post action.
Note: It is recommended to use lifecycle method rather than this callback function.
setState({ name: ‘John’ }, () => console.log(‘The name has updated and component re-rendered’))
- In HTML, the event name should be in lowercase:
Whereas in React it follows camelCase convention:
- In HTML, you can return false to prevent default behavior:
Whereas in React you must call preventDefault() explicitly:
function handleClick(event) {
event.preventDefault()
console.log(‘The link was clicked.’)
}
There are 3 possible ways to achieve this:
- Binding in Constructor: In JavaScript classes, the methods are not bound by default. The same thing applies for React event handlers defined as class methods. Normally we bind them in constructor.
class Component extends React.Componenet {
constructor(props) {
super(props)
this.handleClick = this.handleClick.bind(this)
}
handleClick() {
// …
}
}
- Public class fields syntax: If you don’t like to use bind approach then public class fields syntax can be used to correctly bind callbacks.
handleClick = () => {
console.log(‘this is:’, this)
}
{‘Click me’}
- Arrow functions in callbacks: You can use arrow functions directly in the callbacks.
{‘Click me’}
Note: If the callback is passed as prop to child components, those components might do an extra re-rendering. In those cases, it is preferred to go with .bind() or public class fields syntax approach considering performance.
You can use an arrow function to wrap around an event handler and pass parameters:
This is an equivalent to calling .bind:
SyntheticEvent is a cross-browser wrapper around the browser’s native event. It’s API is same as the browser’s native event, including stopPropagation() and preventDefault(), except the events work identically across all browsers
You can use either if statements or ternary expressions which are available from JS to conditionally render expressions. Apart from these approaches, you can also embed any expressions in JSX by wrapping them in curly braces and then followed by JS logical operator &&.
Hello!
{
messages.length > 0 && !isLogin?
You have {messages.length} unread messages.
:
You don’t have unread messages.
}
A key is a special string attribute you should include when creating arrays of elements. Keys help React identify which items have changed, are added, or are removed.
Most often we use IDs from our data as keys:
const todoItems = todos.map((todo) =>
{todo.text}
)
When you don’t have stable IDs for rendered items, you may use the item index as a key as a last resort:
const todoItems = todos.map((todo, index) =>
{todo.text}
)
Note:
- Using indexes for keys is not recommended if the order of items may change. This can negatively impact performance and may cause issues with component state.
- If you extract list item as separate component then apply keys on list component instead of li tag.
- There will be a warning message in the console if the key prop is not present on list items.
The ref is used to return a reference to the element. They should be avoided in most cases, however, they can be useful when you need a direct access to the DOM element or an instance of a component.
There are two approaches
- This is a recently added approach. Refs are created using React.createRef() method and attached to React elements via the ref attribute. In order to use refs throughout the component, just assign the ref to the instance property within constructor.
class MyComponent extends React.Component {
constructor(props) {
super(props)
this.myRef = React.createRef()
}
render() {
return
}
}
- You can also use ref callbacks approach regardless of React version. For example, the search bar component’s input element accessed as follows,
class SearchBar extends Component {
constructor(props) {
super(props);
this.txtSearch = null;
this.state = { term: ” };
this.setInputSearchRef = e => {
this.txtSearch = e;
}
}
onInputChange(event) {
this.setState({ term: this.txtSearch.value });
}
render() {
return (
);
}
}
You can also use refs in function components using closures. Note: You can also use inline ref callbacks even though it is not a recommended approach
Ref forwarding is a feature that lets some components take a ref they receive, and pass it further down to a child.
const ButtonElement = React.forwardRef((props, ref) => (
{props.children}
));
// Create ref to the DOM button:
const ref = React.createRef();
{‘Forward Ref’}
It is preferred to use callback refs over findDOMNode() API. Because findDOMNode() prevents certain improvements in React in the future.
The legacy approach of using findDOMNode:
class MyComponent extends Component {
componentDidMount() {
findDOMNode(this).scrollIntoView()
}
render() {
return
}
}
The recommended approach is:
class MyComponent extends Component {
componentDidMount() {
this.node.scrollIntoView()
}
render() {
return
this.node = node} />
}
}
The Virtual DOM (VDOM) is an in-memory representation of Real DOM. The representation of a UI is kept in memory and synced with the “real” DOM. It’s a step that happens between the render function being called and the displaying of elements on the screen. This entire process is called reconciliation.
The Virtual DOM works in three simple steps.
- Whenever any underlying data changes, the entire UI is re-rendered in Virtual DOM representation.
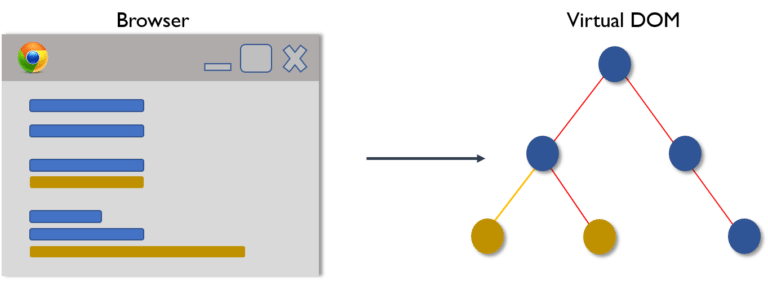
- Then the difference between the previous DOM representation and the new one is calculated.

- Once the calculations are done, the real DOM will be updated with only the things that have actually changed.

The Shadow DOM is a browser technology designed primarily for scoping variables and CSS in web components. The Virtual DOM is a concept implemented by libraries in JavaScript on top of browser APIs.
Uipath (58)
Converting tedious tasks to total UI automation , UiPath Studio is a complete software solution that enables you to carry out repetitive tasks of your back office, easy and speedy.
uipath is the vendor for the leading automation process of robotics. It actually helps in providing a software platform which will help in an organization like automate business. The main objective of the software robot is to help in the manipulation of the application’s layer of presentation like the way any human will do.
Both come across as good tools and both have their own softwares. UI and BP, both have graphic process designers for developing the solutions.
Differences:
- In terms of programming languages,
Blue Prism Uses C# for coding
UiPath uses VB for coding
- In terms of Control Room/Dashboard,
BP has client based servers, accessible only through their apps
UiPath control room – The Orchestrator – is web based, accessible through browser or mobile
- In terms of cost and uses,
UiPath is more affordable
It’s easier to learn on your own and operate
It’s a cake walk finding study material online
Thin client: It’s basically any application where we cannot get quality properties, while spying (using any RPA tool). For e.g. Citrix or any virtual environment.
Thick client: It’s any application where we get handful of attribute properties (using RPA tools).For e.g. calculator, Internet explorer
Blue Prism’s digital workforce is fabricated, managed and asserted by the user or customer. Spanning operations and technology, it sticks to an enterprise-wide robotic operating model. It is code-free and can computerize any software.
The digital workforce can be applied to automate processes in any department where managerial or administrative work is performed over an organization.
No, managerial Robotic Automation is a generation on ahead from old technologies like screen scratching or macros.
Differences:
- Robots are universal application orchestrators – any application that can be used by a man can be used by a present day robot, whether mainframe, bespoke application, legacy, web service enabled or even a close 3rd party API hosted service.
- Robots assemble procedural knowledge, which after some time, joins a shared library that can re-used by some other robot or device.
- Applications are “read” by the robot, either through submitted APIs where they exist, through the OS before application appear, or through the screen with respect to the native application. In this last case, the modern robot “reads” an application screen in context and in the same way a user does. As part of the robot training it is shown how to read the application’s display much like a user.
Blue Prism has incorporated several years of experience of integration and various technologies into its software. The technologies used are secure, reliable and robust. Instead of creating new adaptors for e unique applications, we have developed technology adaptors for all the technologies employed at the presentation layer – Windows, Web, Java, Green Screen/Mainframe and even Citrix.
This, consolidated with a broad assortment of dedicated tools with developed means, that we are confident in, in being able to link any system with the click of a button. This proven application orchestration ability ensures that new processes can be quickly designed, built and tested without any impact on existing systems.
Blue Prism has been exclusively designed for flexibility and to meet the most robust IT standards, for IT operational integrity, security and sup portability. The software can be deployed either as a front office or back office process, running quite happily on a standard desktop in the front office or on any scale of systems for back office processing.
A Blue Prism Process is created as a diagram that looks like a business flow diagram. Processes are created in a zone of Blue Prism named Process Studio which looks similar to other process modelling applications and uses standard flow diagram symbols and notation.
Robotic automation is a type of automation where a machine or computer mimics a human’s action in completing rules based tasks.
Robotic Automation implies process automation where computer software drives existing enterprise application software in the same way that a user does. Automation is a gadget or stage that operates other application software through the existing application UI.
Security and auditability are consolidated into the Blue Prism robotic automation platform at various levels. The runtime environment is totally separate to the process editing environment.
Approvals to design, create, edit and run processes and business objects are specific to each authorized user.
A full audit trail of changes to any process is kept, and comparisons of before and after effect, of changes are provided.
The log created at run-time for each process provides a detailed, time-stamped history of every action and decision taken within an automated process.
Our clients tend to find that running a process with Blue Prism gives them a lot more control than a manual process, and from a compliance point of view that assures processes are run consistently, in line with the process definition.
Blue Prism acclaims a phased approach to getting started as the Operational Agility framework is very scalable. It is typical to target the configuration of 1 and 10 processes initially, with a rolling program of processes being introduced once the outline is established.
It genuinely depends on the capacities you already have in house and the way you wish to work. Blue Prism can give a full extent of services from basic training, reinforcing and mentoring with a view to quickly get your team independently delivering ongoing automations, right through to a full turnkey package, where we will take responsibility for delivering business benefit within agreed service levels.
- Supports both internal and external Encryption/Decryption Keys
- Automation process can be designed within IT Governance
- High-level Robustness because of .NET customized code within the process automation
- Provides Audit Logs enabling
A “fully loaded” office robot is around 1/3rd the cost of universally sourced agents. The flexibility and ease of disposition means that this comparison is easy to maintain and judge the nested method to a given task.
Ctrl + D – Ignores the activity that is currently selected by placing it into a Comment Out container.
Ctrl + E – Removes the activity from the Comment Out container it was placed in.
Ctrl + T – Places the activity inside the Try section of a Try Catch activity.
Ctrl + Shift + N – Creates a new Blank Project.
Ctrl + N – Creates a new Sequence Diagram in the current project.
Ctrl + O – Enables you to open a previously created workflow. Only .xaml files are supported.
F1 – Enables you to access a help topic associated with the currently selected element.
Ctrl + L – Opens the folder where the Log files are stored.
Shift + F9 – Removes all the breakpoints in the currently opened workflow.
Ctrl + S – Saves the currently opened workflow.
Ctrl + Shift + S – Saves all the workflows that are currently open.
F5 – Runs the workflow that is currently open.
F7 – Runs the currently opened workflow in debug mode.
F8 – Checks the currently opened workflow for validation errors.
F9 – Marks the selected activity with a breakpoint.
F10 – When debugging, steps over the execution of a block of activities in the currently selected workflow.
F11 – When debugging, enables you to step into a block of activities and executes the first one.
Pause – Pauses the execution of the current workflow, in both normal and debug mode.
F12 – Stops the execution of the current workflow, in both normal and debug mode.
Ctrl + C – Copies the selected activity or activities to the clipboard.
Alt + Ctrl + W – Opens the Web Recording toolbar.
Alt + Ctrl + B – Opens the Basic Recording toolbar.
Alt + Ctrl + C – Opens the Citrix Recording toolbar.
Alt + Ctrl + D – Opens the Desktop Recording toolbar.
Alt + Ctrl + F – Sets the focus to the search box in the Activities Panel.
Ctrl + P – Opens the Manage Packages window.
Leading Robotic Process Automation vendor.
Delivers enterprise-wide automation benefits, residing within an open, extensible architecture.
The perfectly intuitive environment where anybody can model automation visually
A highly scalable server platform, Orchestrator deploys and manages your entire workforce.
The UiPath Robot can take the role of an automated assistant running efficiently.
UiPath Inc.
Enterprise RPA Platform / Community Edition
UiPath Vs Automation AnyWhere
Features
Uipath
Automation Anywhere
Learning
Visual design
Basic developer
Re – usability
Code Reusability
Code Reusability
Cognitive Capability
Not so cognitive
Moderately cognitive
Reliability
Moderately reliable
Highly reliable
Robots
FullStack robots
Full Stack Robots
Operational Scalability
Scaability recommended for small projects only
Highly scalable for small and mediums
Process Designer
Visual process designer tool
Scripting is done to design process
Architecture
Web based integration
Architecture includes client and server
Access
Supports browser and mobile app.
Supports access through app only
Pricing
Aggressive, attractive entry-level pricing
Higher cost of deployment
Selenium has been designed for testing the web applications or website. A selenium can’t interact with a huge number of applications. It is unable to use one’s application’s output and use them as a new input for another application and is not compatible with the virtual environments like the Citrix.
Whereas Uipath generally designs the software process that helps in automation. It is a sort of RPA tool which will help in performing activities like the human.
Variable is used for storing data. You can also change the value of the variable. When some data is stored within some variable then that value can be of many types. In uipath, there is a huge number of data types starting from text number, generic value, time, date and data tables.
Argument helps the program to creates some arguments where you can also make some changes. In arguments, you have to mention the name which is mandatory. Write about the direction and select the argument type whether they are a string, object, Int 32 or array.
In uipath, you can use a lot of activities which is used for automating the apps of the web apps which you can see in the activity panel under the category of UI automation. The common properties of these activities are ContinueOnError, Delay After, Delay Before, TimeoutMS, WaitForReady, and target.
The flowchart is generally used for various settings. It helps in large jobs as well as in small projects and you can also use them in different projects. Flowcharts help in presenting multiple branching of logical operators, helps in building complex business and for connecting the activities in many ways.
Flow switch and flow decision are the same things but it has one difference and that is in the flow switch each branch of the flow switch is known as flow step and is not just restricted to true or false branch.
The sequence is actually the small type of projects which are suitable mainly for linear processes and will enable you to switch from one activity to the another seamlessly. It actually acts as a single activity block. You can reuse them for many times.
When a machine is using a certain number of states for automation during the execution it is known as the state machine. It will only switch from one state to another if any action is triggered.
When it comes to branching in uipath there comes a “condition”. This condition is used when an activity is having more than one solution occurs after a certain condition. Condition statement will help the program to determine what behavior should be shown when any condition will be selected.
For creating a project in uipath you will have to create a folder with your name and then select a particular location. So the new folder will get saved in the default directory.
Uipath has 4 recordings. They are Basic, desktop, web, and Citrix.
Basic: It is used for the generation of the full selector for every activity but has no container. Hence the automation is much slower but is good for the single activities.
Desktop: It is great for multiple actions and desktop apps. It is much faster than the basic and uses the container where the activities will be enclosed and will also have partial selector.
Web: It is used for recording in the web pages and for browsing. It also generates the container.
Citrix: It is used for recording of virtualized environments, permits texts, images and the keyboard automation.
Wildcrafts helps in replacing the strings. It is helpful when you will deal with the attributes which are changing dynamically in the selector.
And the selector helps in automatically generating the selection by using the wildcraft.
Data scraping helps in enabling the extraction of structured data, document or application. Structured data is a group of information that is organized and presented in a predictable pattern.
We need the assign activity because it helps in assigning values to the variables. Mostly they are used when there is a need for incrementing the variable’s value when there is a loop. You can add the value and then store them to another variable or it helps in assigning the value to some array.
Uipath uses the delay activity for making you pause or stop the automation for some period. This is mainly used in projects where you need good timing like waiting and then start of some particular applications or waiting for information processing which you can use in the different activity.
Do while helps in enabling the programme to execute the specific part of an automation when the condition will be true. If the condition is not true then the loop won’t be executed. This activity is used for step through the element present in the array or it also helps in executing any particular activity for many times. You can use counters for keeping track of the increment.
If activity is used when you will deal with two conditions where the first statement will get executed if the condition is true while the second one will get executed when the statement will be false. When the variable will have values then the if statement is basically used.
The switch activity helps you to choose one out of the others based on the specified values of the expressions. Switch activity uses integer argument as default but you can easily change it by going to the properties panel and selecting the required Type Argument list. It helps in categorizing the data depending on the case number.
This activity helps in processing a specific activity repeatedly when a particular condition is true. The primary difference between while and do while is that in the former one the condition will be evaluated first and then the loop will be executed.
This statement helps in enabling the step with the help of arrays, data tables, lists or any other sort of collections. It enables you to iterate the data and then process every information individually.
With the help of break activity, you can easily stop a particular loop at any chosen point and at that time you can continue with any other activity.
With the help of package manager, you can easily download the activity packages, frameworks, libraries, wrappers etc and you can also check the ones which are already present in the container and you can also update them or add or remove them. All these features are only possible because of manage packages window which you can easily open by clicking the package manager button by pressing on the activity panel.
Debugging is used for identifying as well as showing the error for a particular project. It has breakpoints and logging and it is a type of powerful functionality which will help you to gather information about the project and will highlight the errors step by step. Logging helps you to know what your projects are going through when the programming is done and is shown in the output panel. Which helps in making the process of debugging easier. Whereas breakpoints help in pausing the execution of your project to helps you check the state of the program at a particular point.
Automation recording is used as they are very much useful plus it can save you a lot of time. As this automatic recording will provide a skeleton of the entire business processes so you can easily parameterize and customise the project.
Publishing of the automation package indicates archiving it and the related files present in particular folder for sending it to robots and then executing it. When you will be connected to the orchestrator then the project will go to the orchestrator field and then it will be displayed on packages page. And from this place, you can easily distribute them to the other robots after you assign some packages to the environment. Otherwise, it will get stored locally in the studio feed.
There are different types of activities which are used in the web pages or in automating apps and you can easily find them in the section of activities panel categorized under UI automation. These UI activities have many properties in common.
ContinueOnError: Even when the activity will show error still, the automation will continue its work. This field works in the boolean values. False is the default value in here. The project won’t show any error if the activity on this field is set to true inside the try catch.
Delay After: It helps in pausing the activity.
Delay Before: It helps to pause before any activity.
TimeoutMS: It helps in finding the element before the error is shown.
WaitForReady: It will wait until the target is ready and before you perform the activity.
Target: It helps in identifying the element in UI before the activity starts.
If you want to enable the image and text-based process automation, you will have to see that the uipath has some features that will simulate the keyboard or mouse input, like hovering, clicking, text recognition, OCR activities etc that helps for identifying by UI elements by screen scraping. Image or text automation is basically used in the situations where the UI automation won’t work like in the environment of the virtual machine or in the places where finding selectors by using the normal methods is not easy.
The virtual machine is the emulation of the computer science. If you efficiently want to process the automation in the Citrix machines then you will need techniques and tool. The Citrix automation in uipath is used for operating the virtual machine.
Yes, I have worked on the virtual machine automation previously.
These are some of the important interview equation which you will face during uipath interview. It contains both beginners level questions to questions for experienced people. To learn more about uipath, it is very important to have a sound knowledge of automation and virtual machine.
Code Free:
RPA doesn’t require programming skills. Employees with any subject expertise can be trained to automate RPA tools instantly. The whole work revolves around RPA chart which provides a flowchart designer to graphically link, drag and drop icons to represent steps in a process.
User-Friendly:
RPA adoption originates within business operations rather inside IT departments. RPA projects require less IT skills and less investment. Eventually, the automation is lowered at a substantial rate.
Non- Disruptive:
RPA avoids complexity and risk. The software robots access end users systems via a controlled user interface, hence reducing the necessity of underlying systems programming.
Wide-Range Automation:
RPA speeds up and executes perfect accuracy across different fields viz. banking, healthcare, insurance, telecom, communications, etc. Virtually complex programs are automated on a wide-range by improving the transaction process.
Quick ROI:
RPA will increase productivity across varied industries. One Software robot is efficient of accomplishing the work of approximately 3 employees. This innovation builds positive ROI much faster than expected. Moreover, cost productions might reach 20% in time.
Enterprise Scalability:
RPA is highly flexible and scalable with reduced time of induction. Robots perform massive complex operations in parallel, starting from desktop to cloud environments. All this operation is carried out, by allowing multiple users to monitor and control robots from various business units through a single secure device.
Powerful Analytics:
Gathering agile and exhaustive data enable better management and insights into forever growing business enhancements. Improved governance is achieved through a prescribed set of automation tools.
Cost-Saving:
Implementing RPA within an enterprise has shown a drastic reduction in overall costs when compared to traditional non-RPA methods.
RPA is constantly leveraging in the market world-wide. It is already being implemented by broad-range of industries. Enterprises now enjoy the freedom of optimizing costs and going up freeing their resources. This ultimately leads to new business visions in crowded marketplaces.
- Automation Anywhere
- Blue Prism
- Openspan
- UIPath
- Verint
- BlackLine
- NICE Actimize
- Datamatics
- Kofax
- EdgeVerve
- HelpSystems
Analysis:
The first phase in RPA begins with analysis. Business team and RPA Architect work together to understand a business process for RPA development.
Bot Development:
RPA developer (Team) starts working on the requirement in their environment possibly a distinct development environment.
Testing:
Some companies conduct Testing by Separate Testing Team, while some have a dedicated testing team which performs a dedicated QA like normal SDLC flow. Best Practice is to have a dedicated testing team which performs QA of the developed bot.
Deployment and Maintenance:
After the Development and Testing phases, a bot is ready for distribution and enters maintenance phase.
By considering several factors we select a RPA Tool for Businness Process Automation,
Technology
First and foremost is the technology in which RPA tool has been built, like Microsoft, .NET, IBM Mainframe, Java, web etc. The tool has to be platform independent, considering many of the organizations perform their day to day tasks outside the local desktop using Citrix or Virtual machines etc. So the automation solution should be able to support any application and platform.
Interface
Next most important feature is the RPA tool’s user interface. A complex user interface will delay the process of implementation and increase the learning curve and adaptability. A more user-friendly interface like drag and drop, auto capture, image recognition etc. would be better.
Management
It is important to know how effectively and easily the robots can be managed considering these robots are going to be replacing your human workforce. There should be a high level of visibility and control in terms of process monitoring, process change, development, re-use etc.
Security
Security is one of the most important factors to be considered. How safe are the robots when compared to the humans? After all robots/RPA tools are also a piece of software, so how much more security controls can be implemented, test the code rigidly and lock it up, the better.
WORDPRESS (1)
WordPress is an open source Content Management System (CMS), which allows the users to build dynamic websites and blog.
ENQUIRY FORM
Any
A marquee allows you to put a scrolling text in a web page. To do this, place whatever text you want to appear scrolling within the tags.
Content is placed in between HTML tags in order to properly format it. It makes use of the less than symbol (<) and the greater than symbol (>). A slash symbol is also used as a closing tag.
No. The
tag is only one way to separate lines of text. Other tags, like the
tag and
tag, also separate sections of text.
The default color for normal and active links is blue. Some browsers recognize an active link when the mouse cursor is placed over that link; others recognize active links when the link has the focus. Those that don’t have a mouse cursor over that link is considered a normal link.
Style sheets do not limit the number of style definitions that can be included within the brackets for a given selector. Every new style definition, however, must be separated from the others by a semicolon symbol.
You can define several selectors with the same style definition by separating them with commas. This same technique also works for selectors with class names.
To do this, place a tag code after the tag
If the list-style-type property is used on a non-list element like a paragraph, the property will be ignored and do not affect the paragraph.
Frames can make navigating a site much easier. If the main links to the site are located in a frame that appears at the top or along the edge of the browser, the content for those links can be displayed in the remainder of the browser window.
The latest versions of Google Chrome, Apple Safari, Mozilla Firefox, and Opera all support most of the HTML5 features.
The
This tag represents a piece of self-contained flow content. It is mostly used as a single unit as a reference the main flow of the document.
The canvas element helps to build charts, graphs, bypass Photoshop to create 2D images and place them directly into HTML5 code.
The new Form elements in HTML5 offers much better functionality than the earlier versions.
The tags given provided to carry out these functions are:
1)
2)
3)
Two main benefits of HTML5 Web Storage:
- It can store up to 10 MB data which is certainly more than what cookies have.
- Web storage data cannot be transferred with the HTTP request. It helps to increase the performance of the application.
Two storage types of HTML5 are:
Session Storage:
It stores data of current session only. It means that the data stored in session storage clear automatically when the browser is closed.
Local Storage:
Local storage is another type of HTML5 Web Storage. In local storage, data is not deleted automatically when the current browser window is closed.
The Application Cache concept means that a web application is cached. It can be accessible without the need for internet connection.
Some advantages of Application Cache:
- Offline browsing – Web users can also use the application when they are offline.
- Speed – Cached resources load quicker
- Reduce the server load – The web browser will only download updated resources from the server.
Following are the important, new data types offered by HTML5:
- Date: It allows the user to select a date.
- datetime-local: This input type allows the user to select a date and time without time zone.
- datetime: This input type allows the user to select a date and time with time zone.
- month: It enables the user to select a month and year
- email: These input fields used to contain an e-mail address.
JAVACSRIPT (1)
JavaScript Tutorial for beginners and professionals is a solution of client side dynamic pages.
JavaScript is an object-based scripting language that is lightweight and cross-platform.
JavaScript is not compiled but translated. The JavaScript Translator (embedded in browser) is responsible to translate the JavaScript code.
JQUERY (1)
jQuery is a fast, lightweight, feature-rich client side JavaScript framework. It has provided a much needed boost to JavaScript. Before jQuery, JavaScript codes were lengthy and bigger, even for smaller functionality.
MONGO DB (1)
Although MongoDB and MySQL both are free and open source databases, there is a lot of difference between them in the term of data representation, relationship, transaction, querying data, schema design and definition, performance speed, normalization and many more. To compare MySQL with MongoDB is like a comparison between Relational and Non-relational databases.
NODE JS (1)
Node.js is a server side scripting based on Google’s V8 JavaScript engine. It is used to build scalable programs especially web applications that are computationally simple but are frequently accessed.
PHP (1)
PHP is a server side scripting language commonly used for web applications. PHP has many frameworks and cms for creating websites.Even a non technical person can cretae sites using its CMS.WordPress,osCommerce are the famus CMS of php.It is also an object oriented programming language like java,C-sharp etc.It is very eazy for learning
REACT JS (26)
React is an open-source JAVASCRIPT library developed by Facebook Engineers for building complex and interactive User Interfaces in web & mobile applictions.
React is an open-source frontend JavaScript library which is used for building user interfaces especially for single page applications. It is used for handling view layer for web and mobile apps. React was created by Jordan Walke, a software engineer working for Facebook. React was first deployed on Facebook’s News Feed in 2011 and on Instagram in 2012.
- It uses VirtualDOM instead RealDOM considering that RealDOM manipulations are expensive.
- Supports server-side rendering.
- Follows Unidirectional* data flow or data binding.
- Uses reusable/composable UI components to develop the view.
JSX is a XML-like syntax extension to ECMAScript (the acronym stands for JavaScript XML). Basically it just provides syntactic sugar for the React.createElement() function, giving us expressiveness of JavaScript along with HTML like template syntax.
In the example below text inside ;
; tag return as JavaScript function to the render function.
class App extends React.Component {
render() {
return(
{‘Welcome to React world!’}
)
}
}
An Element is a plain object describing what you want to appear on the screen in terms of the DOM nodes or other components. Elements can contain other Elements in their props. Creating a React element is cheap. Once an element is created, it is never mutated.
The object representation of React Element would be as follows:
const element = React.createElement(
‘div’,
{id: ‘login-btn’},
‘Login’
)
The above React.createElement() function returns an object:
{
type: ‘div’,
props: {
children: ‘Login’,
id: ‘login-btn’
}
}
And finally it renders to the DOM using ReactDOM.render():
Whereas a component can be declared in several different ways. It can be a class with a render() method. Alternatively, in simple cases, it can be defined as a function. In either case, it takes props as an input, and returns an JSX tree as the output:
const Button = ({ onLogin }) =>
Then JSX gets transpiled to React.createElement() function tree:
const Button = ({ onLogin }) => React.createElement(
‘div’,
{ id: ‘login-btn’, onClick: onLogin },
‘Login’
)
There are two possible ways to create a component.
1. Function Components: This is the simplest way to create a component. Those are pure JavaScript functions that accept props object as first parameter and return React elements:
2. function Greeting({ message }) {
3. return
{`Hello, ${message}`}
}
4. Class Components: You can also use ES6 class to define a component. The above function component can be written as:
5. class Greeting extends React.Component {
6. render() {
7. return
{`Hello, ${this.props.message}`}
8. }
If the component needs state or lifecycle methods then use class component otherwise use function component.
React.PureComponent is exactly the same as React.Component except that it handles the shouldComponentUpdate() method for you. When props or state changes, PureComponent will do a shallow comparison on both props and state. Component on the other hand won’t compare current props and state to next out of the box. Thus, the component will re-render by default whenever shouldComponentUpdate is called.
State of a component is an object that holds some information that may change over the lifetime of the component. We should always try to make our state as simple as possible and minimize the number of stateful components. Let’s create an user component with message state,
class User extends React.Component {
constructor(props) {
super(props)
this.state = {
message: ‘Welcome to React world’
}
}
render() {
return (
{this.state.message}
)
}
}
State is similar to props, but it is private and fully controlled by the component. i.e, It is not accessible to any component other than the one that owns and sets it.
Props are inputs to components. They are single values or objects containing a set of values that are passed to components on creation using a naming convention similar to HTML-tag attributes. They are data passed down from a parent component to a child component.
The primary purpose of props in React is to provide following component functionality:
- Pass custom data to your component.
- Trigger state changes.
- Use via this.props.reactProp inside component’s render() method.
For example, let us create an element with reactProp property:
This reactProp (or whatever you came up with) name then becomes a property attached to React’s native props object which originally already exists on all components created using React library.
props.reactProp
Both props and state are plain JavaScript objects. While both of them hold information that influences the output of render, they are different in their functionality with respect to component. Props get passed to the component similar to function parameters whereas state is managed within the component similar to variables declared within a function.
If you try to update state directly then it won’t re-render the component.
//Wrong
this.state.message = ‘Hello world’
Instead use setState() method. It schedules an update to a component’s state object. When state changes, the component responds by re-rendering.
//Correct
this.setState({ message: ‘Hello World’ })
Note: You can directly assign to the state object either in constructor or using latest javascript’s class field declaration syntax.
The callback function is invoked when setState finished and the component gets rendered. Since setState() is asynchronous the callback function is used for any post action.
Note: It is recommended to use lifecycle method rather than this callback function.
setState({ name: ‘John’ }, () => console.log(‘The name has updated and component re-rendered’))
- In HTML, the event name should be in lowercase:
Whereas in React it follows camelCase convention:
- In HTML, you can return false to prevent default behavior:
Whereas in React you must call preventDefault() explicitly:
function handleClick(event) {
event.preventDefault()
console.log(‘The link was clicked.’)
}
There are 3 possible ways to achieve this:
- Binding in Constructor: In JavaScript classes, the methods are not bound by default. The same thing applies for React event handlers defined as class methods. Normally we bind them in constructor.
class Component extends React.Componenet {
constructor(props) {
super(props)
this.handleClick = this.handleClick.bind(this)
}
handleClick() {
// …
}
}
- Public class fields syntax: If you don’t like to use bind approach then public class fields syntax can be used to correctly bind callbacks.
handleClick = () => {
console.log(‘this is:’, this)
}
{‘Click me’}
- Arrow functions in callbacks: You can use arrow functions directly in the callbacks.
{‘Click me’}
Note: If the callback is passed as prop to child components, those components might do an extra re-rendering. In those cases, it is preferred to go with .bind() or public class fields syntax approach considering performance.
You can use an arrow function to wrap around an event handler and pass parameters:
This is an equivalent to calling .bind:
SyntheticEvent is a cross-browser wrapper around the browser’s native event. It’s API is same as the browser’s native event, including stopPropagation() and preventDefault(), except the events work identically across all browsers
You can use either if statements or ternary expressions which are available from JS to conditionally render expressions. Apart from these approaches, you can also embed any expressions in JSX by wrapping them in curly braces and then followed by JS logical operator &&.
Hello!
{
messages.length > 0 && !isLogin?
You have {messages.length} unread messages.
:
You don’t have unread messages.
}
A key is a special string attribute you should include when creating arrays of elements. Keys help React identify which items have changed, are added, or are removed.
Most often we use IDs from our data as keys:
const todoItems = todos.map((todo) =>
{todo.text}
)
When you don’t have stable IDs for rendered items, you may use the item index as a key as a last resort:
const todoItems = todos.map((todo, index) =>
{todo.text}
)
Note:
- Using indexes for keys is not recommended if the order of items may change. This can negatively impact performance and may cause issues with component state.
- If you extract list item as separate component then apply keys on list component instead of li tag.
- There will be a warning message in the console if the key prop is not present on list items.
The ref is used to return a reference to the element. They should be avoided in most cases, however, they can be useful when you need a direct access to the DOM element or an instance of a component.
There are two approaches
- This is a recently added approach. Refs are created using React.createRef() method and attached to React elements via the ref attribute. In order to use refs throughout the component, just assign the ref to the instance property within constructor.
class MyComponent extends React.Component {
constructor(props) {
super(props)
this.myRef = React.createRef()
}
render() {
return
}
}
- You can also use ref callbacks approach regardless of React version. For example, the search bar component’s input element accessed as follows,
class SearchBar extends Component {
constructor(props) {
super(props);
this.txtSearch = null;
this.state = { term: ” };
this.setInputSearchRef = e => {
this.txtSearch = e;
}
}
onInputChange(event) {
this.setState({ term: this.txtSearch.value });
}
render() {
return (
);
}
}
You can also use refs in function components using closures. Note: You can also use inline ref callbacks even though it is not a recommended approach
Ref forwarding is a feature that lets some components take a ref they receive, and pass it further down to a child.
const ButtonElement = React.forwardRef((props, ref) => (
{props.children}
));
// Create ref to the DOM button:
const ref = React.createRef();
It is preferred to use callback refs over findDOMNode() API. Because findDOMNode() prevents certain improvements in React in the future.
The legacy approach of using findDOMNode:
class MyComponent extends Component {
componentDidMount() {
findDOMNode(this).scrollIntoView()
}
render() {
return
}
}
The recommended approach is:
class MyComponent extends Component {
componentDidMount() {
this.node.scrollIntoView()
}
render() {
return
}
}
The Virtual DOM (VDOM) is an in-memory representation of Real DOM. The representation of a UI is kept in memory and synced with the “real” DOM. It’s a step that happens between the render function being called and the displaying of elements on the screen. This entire process is called reconciliation.
The Virtual DOM works in three simple steps.
- Whenever any underlying data changes, the entire UI is re-rendered in Virtual DOM representation.
- Then the difference between the previous DOM representation and the new one is calculated.
- Once the calculations are done, the real DOM will be updated with only the things that have actually changed.
The Shadow DOM is a browser technology designed primarily for scoping variables and CSS in web components. The Virtual DOM is a concept implemented by libraries in JavaScript on top of browser APIs.
Uipath (58)
Converting tedious tasks to total UI automation , UiPath Studio is a complete software solution that enables you to carry out repetitive tasks of your back office, easy and speedy.
uipath is the vendor for the leading automation process of robotics. It actually helps in providing a software platform which will help in an organization like automate business. The main objective of the software robot is to help in the manipulation of the application’s layer of presentation like the way any human will do.
Both come across as good tools and both have their own softwares. UI and BP, both have graphic process designers for developing the solutions.
Differences:
- In terms of programming languages,
Blue Prism Uses C# for coding
UiPath uses VB for coding
- In terms of Control Room/Dashboard,
BP has client based servers, accessible only through their apps
UiPath control room – The Orchestrator – is web based, accessible through browser or mobile
- In terms of cost and uses,
UiPath is more affordable
It’s easier to learn on your own and operate
It’s a cake walk finding study material online
Thin client: It’s basically any application where we cannot get quality properties, while spying (using any RPA tool). For e.g. Citrix or any virtual environment.
Thick client: It’s any application where we get handful of attribute properties (using RPA tools).For e.g. calculator, Internet explorer
Blue Prism’s digital workforce is fabricated, managed and asserted by the user or customer. Spanning operations and technology, it sticks to an enterprise-wide robotic operating model. It is code-free and can computerize any software.
The digital workforce can be applied to automate processes in any department where managerial or administrative work is performed over an organization.
No, managerial Robotic Automation is a generation on ahead from old technologies like screen scratching or macros.
Differences:
- Robots are universal application orchestrators – any application that can be used by a man can be used by a present day robot, whether mainframe, bespoke application, legacy, web service enabled or even a close 3rd party API hosted service.
- Robots assemble procedural knowledge, which after some time, joins a shared library that can re-used by some other robot or device.
- Applications are “read” by the robot, either through submitted APIs where they exist, through the OS before application appear, or through the screen with respect to the native application. In this last case, the modern robot “reads” an application screen in context and in the same way a user does. As part of the robot training it is shown how to read the application’s display much like a user.
Blue Prism has incorporated several years of experience of integration and various technologies into its software. The technologies used are secure, reliable and robust. Instead of creating new adaptors for e unique applications, we have developed technology adaptors for all the technologies employed at the presentation layer – Windows, Web, Java, Green Screen/Mainframe and even Citrix.
This, consolidated with a broad assortment of dedicated tools with developed means, that we are confident in, in being able to link any system with the click of a button. This proven application orchestration ability ensures that new processes can be quickly designed, built and tested without any impact on existing systems.
Blue Prism has been exclusively designed for flexibility and to meet the most robust IT standards, for IT operational integrity, security and sup portability. The software can be deployed either as a front office or back office process, running quite happily on a standard desktop in the front office or on any scale of systems for back office processing.
A Blue Prism Process is created as a diagram that looks like a business flow diagram. Processes are created in a zone of Blue Prism named Process Studio which looks similar to other process modelling applications and uses standard flow diagram symbols and notation.
Robotic automation is a type of automation where a machine or computer mimics a human’s action in completing rules based tasks.
Robotic Automation implies process automation where computer software drives existing enterprise application software in the same way that a user does. Automation is a gadget or stage that operates other application software through the existing application UI.
Security and auditability are consolidated into the Blue Prism robotic automation platform at various levels. The runtime environment is totally separate to the process editing environment.
Approvals to design, create, edit and run processes and business objects are specific to each authorized user.
A full audit trail of changes to any process is kept, and comparisons of before and after effect, of changes are provided.
The log created at run-time for each process provides a detailed, time-stamped history of every action and decision taken within an automated process.
Our clients tend to find that running a process with Blue Prism gives them a lot more control than a manual process, and from a compliance point of view that assures processes are run consistently, in line with the process definition.
Blue Prism acclaims a phased approach to getting started as the Operational Agility framework is very scalable. It is typical to target the configuration of 1 and 10 processes initially, with a rolling program of processes being introduced once the outline is established.
It genuinely depends on the capacities you already have in house and the way you wish to work. Blue Prism can give a full extent of services from basic training, reinforcing and mentoring with a view to quickly get your team independently delivering ongoing automations, right through to a full turnkey package, where we will take responsibility for delivering business benefit within agreed service levels.
- Supports both internal and external Encryption/Decryption Keys
- Automation process can be designed within IT Governance
- High-level Robustness because of .NET customized code within the process automation
- Provides Audit Logs enabling
A “fully loaded” office robot is around 1/3rd the cost of universally sourced agents. The flexibility and ease of disposition means that this comparison is easy to maintain and judge the nested method to a given task.
Ctrl + D – Ignores the activity that is currently selected by placing it into a Comment Out container.
Ctrl + E – Removes the activity from the Comment Out container it was placed in.
Ctrl + T – Places the activity inside the Try section of a Try Catch activity.
Ctrl + Shift + N – Creates a new Blank Project.
Ctrl + N – Creates a new Sequence Diagram in the current project.
Ctrl + O – Enables you to open a previously created workflow. Only .xaml files are supported.
F1 – Enables you to access a help topic associated with the currently selected element.
Ctrl + L – Opens the folder where the Log files are stored.
Shift + F9 – Removes all the breakpoints in the currently opened workflow.
Ctrl + S – Saves the currently opened workflow.
Ctrl + Shift + S – Saves all the workflows that are currently open.
F5 – Runs the workflow that is currently open.
F7 – Runs the currently opened workflow in debug mode.
F8 – Checks the currently opened workflow for validation errors.
F9 – Marks the selected activity with a breakpoint.
F10 – When debugging, steps over the execution of a block of activities in the currently selected workflow.
F11 – When debugging, enables you to step into a block of activities and executes the first one.
Pause – Pauses the execution of the current workflow, in both normal and debug mode.
F12 – Stops the execution of the current workflow, in both normal and debug mode.
Ctrl + C – Copies the selected activity or activities to the clipboard.
Alt + Ctrl + W – Opens the Web Recording toolbar.
Alt + Ctrl + B – Opens the Basic Recording toolbar.
Alt + Ctrl + C – Opens the Citrix Recording toolbar.
Alt + Ctrl + D – Opens the Desktop Recording toolbar.
Alt + Ctrl + F – Sets the focus to the search box in the Activities Panel.
Ctrl + P – Opens the Manage Packages window.
Leading Robotic Process Automation vendor.
Delivers enterprise-wide automation benefits, residing within an open, extensible architecture.
The perfectly intuitive environment where anybody can model automation visually
A highly scalable server platform, Orchestrator deploys and manages your entire workforce.
The UiPath Robot can take the role of an automated assistant running efficiently.
UiPath Inc.
Enterprise RPA Platform / Community Edition
| UiPath Vs Automation AnyWhere | ||
|---|---|---|
| Features | Uipath | Automation Anywhere |
| Learning | Visual design | Basic developer |
| Re – usability | Code Reusability | Code Reusability |
| Cognitive Capability | Not so cognitive | Moderately cognitive |
| Reliability | Moderately reliable | Highly reliable |
| Robots | FullStack robots | Full Stack Robots |
| Operational Scalability | Scaability recommended for small projects only | Highly scalable for small and mediums |
| Process Designer | Visual process designer tool | Scripting is done to design process |
| Architecture | Web based integration | Architecture includes client and server |
| Access | Supports browser and mobile app. | Supports access through app only |
| Pricing | Aggressive, attractive entry-level pricing | Higher cost of deployment |
Selenium has been designed for testing the web applications or website. A selenium can’t interact with a huge number of applications. It is unable to use one’s application’s output and use them as a new input for another application and is not compatible with the virtual environments like the Citrix.
Whereas Uipath generally designs the software process that helps in automation. It is a sort of RPA tool which will help in performing activities like the human.
Variable is used for storing data. You can also change the value of the variable. When some data is stored within some variable then that value can be of many types. In uipath, there is a huge number of data types starting from text number, generic value, time, date and data tables.
Argument helps the program to creates some arguments where you can also make some changes. In arguments, you have to mention the name which is mandatory. Write about the direction and select the argument type whether they are a string, object, Int 32 or array.
In uipath, you can use a lot of activities which is used for automating the apps of the web apps which you can see in the activity panel under the category of UI automation. The common properties of these activities are ContinueOnError, Delay After, Delay Before, TimeoutMS, WaitForReady, and target.
The flowchart is generally used for various settings. It helps in large jobs as well as in small projects and you can also use them in different projects. Flowcharts help in presenting multiple branching of logical operators, helps in building complex business and for connecting the activities in many ways.
Flow switch and flow decision are the same things but it has one difference and that is in the flow switch each branch of the flow switch is known as flow step and is not just restricted to true or false branch.
The sequence is actually the small type of projects which are suitable mainly for linear processes and will enable you to switch from one activity to the another seamlessly. It actually acts as a single activity block. You can reuse them for many times.
When a machine is using a certain number of states for automation during the execution it is known as the state machine. It will only switch from one state to another if any action is triggered.
When it comes to branching in uipath there comes a “condition”. This condition is used when an activity is having more than one solution occurs after a certain condition. Condition statement will help the program to determine what behavior should be shown when any condition will be selected.
For creating a project in uipath you will have to create a folder with your name and then select a particular location. So the new folder will get saved in the default directory.
Uipath has 4 recordings. They are Basic, desktop, web, and Citrix.
Basic: It is used for the generation of the full selector for every activity but has no container. Hence the automation is much slower but is good for the single activities.
Desktop: It is great for multiple actions and desktop apps. It is much faster than the basic and uses the container where the activities will be enclosed and will also have partial selector.
Web: It is used for recording in the web pages and for browsing. It also generates the container.
Citrix: It is used for recording of virtualized environments, permits texts, images and the keyboard automation.
Wildcrafts helps in replacing the strings. It is helpful when you will deal with the attributes which are changing dynamically in the selector.
And the selector helps in automatically generating the selection by using the wildcraft.
Data scraping helps in enabling the extraction of structured data, document or application. Structured data is a group of information that is organized and presented in a predictable pattern.
We need the assign activity because it helps in assigning values to the variables. Mostly they are used when there is a need for incrementing the variable’s value when there is a loop. You can add the value and then store them to another variable or it helps in assigning the value to some array.
Uipath uses the delay activity for making you pause or stop the automation for some period. This is mainly used in projects where you need good timing like waiting and then start of some particular applications or waiting for information processing which you can use in the different activity.
Do while helps in enabling the programme to execute the specific part of an automation when the condition will be true. If the condition is not true then the loop won’t be executed. This activity is used for step through the element present in the array or it also helps in executing any particular activity for many times. You can use counters for keeping track of the increment.
If activity is used when you will deal with two conditions where the first statement will get executed if the condition is true while the second one will get executed when the statement will be false. When the variable will have values then the if statement is basically used.
The switch activity helps you to choose one out of the others based on the specified values of the expressions. Switch activity uses integer argument as default but you can easily change it by going to the properties panel and selecting the required Type Argument list. It helps in categorizing the data depending on the case number.
This activity helps in processing a specific activity repeatedly when a particular condition is true. The primary difference between while and do while is that in the former one the condition will be evaluated first and then the loop will be executed.
This statement helps in enabling the step with the help of arrays, data tables, lists or any other sort of collections. It enables you to iterate the data and then process every information individually.
With the help of break activity, you can easily stop a particular loop at any chosen point and at that time you can continue with any other activity.
With the help of package manager, you can easily download the activity packages, frameworks, libraries, wrappers etc and you can also check the ones which are already present in the container and you can also update them or add or remove them. All these features are only possible because of manage packages window which you can easily open by clicking the package manager button by pressing on the activity panel.
Debugging is used for identifying as well as showing the error for a particular project. It has breakpoints and logging and it is a type of powerful functionality which will help you to gather information about the project and will highlight the errors step by step. Logging helps you to know what your projects are going through when the programming is done and is shown in the output panel. Which helps in making the process of debugging easier. Whereas breakpoints help in pausing the execution of your project to helps you check the state of the program at a particular point.
Automation recording is used as they are very much useful plus it can save you a lot of time. As this automatic recording will provide a skeleton of the entire business processes so you can easily parameterize and customise the project.
Publishing of the automation package indicates archiving it and the related files present in particular folder for sending it to robots and then executing it. When you will be connected to the orchestrator then the project will go to the orchestrator field and then it will be displayed on packages page. And from this place, you can easily distribute them to the other robots after you assign some packages to the environment. Otherwise, it will get stored locally in the studio feed.
There are different types of activities which are used in the web pages or in automating apps and you can easily find them in the section of activities panel categorized under UI automation. These UI activities have many properties in common.
ContinueOnError: Even when the activity will show error still, the automation will continue its work. This field works in the boolean values. False is the default value in here. The project won’t show any error if the activity on this field is set to true inside the try catch.
Delay After: It helps in pausing the activity.
Delay Before: It helps to pause before any activity.
TimeoutMS: It helps in finding the element before the error is shown.
WaitForReady: It will wait until the target is ready and before you perform the activity.
Target: It helps in identifying the element in UI before the activity starts.
If you want to enable the image and text-based process automation, you will have to see that the uipath has some features that will simulate the keyboard or mouse input, like hovering, clicking, text recognition, OCR activities etc that helps for identifying by UI elements by screen scraping. Image or text automation is basically used in the situations where the UI automation won’t work like in the environment of the virtual machine or in the places where finding selectors by using the normal methods is not easy.
The virtual machine is the emulation of the computer science. If you efficiently want to process the automation in the Citrix machines then you will need techniques and tool. The Citrix automation in uipath is used for operating the virtual machine.
Yes, I have worked on the virtual machine automation previously.
These are some of the important interview equation which you will face during uipath interview. It contains both beginners level questions to questions for experienced people. To learn more about uipath, it is very important to have a sound knowledge of automation and virtual machine.
RPA is constantly leveraging in the market world-wide. It is already being implemented by broad-range of industries. Enterprises now enjoy the freedom of optimizing costs and going up freeing their resources. This ultimately leads to new business visions in crowded marketplaces.
- Automation Anywhere
- Blue Prism
- Openspan
- UIPath
- Verint
- BlackLine
- NICE Actimize
- Datamatics
- Kofax
- EdgeVerve
- HelpSystems
Analysis:
The first phase in RPA begins with analysis. Business team and RPA Architect work together to understand a business process for RPA development.
Bot Development:
RPA developer (Team) starts working on the requirement in their environment possibly a distinct development environment.
Testing:
Some companies conduct Testing by Separate Testing Team, while some have a dedicated testing team which performs a dedicated QA like normal SDLC flow. Best Practice is to have a dedicated testing team which performs QA of the developed bot.
Deployment and Maintenance:
After the Development and Testing phases, a bot is ready for distribution and enters maintenance phase.
By considering several factors we select a RPA Tool for Businness Process Automation,
Technology
First and foremost is the technology in which RPA tool has been built, like Microsoft, .NET, IBM Mainframe, Java, web etc. The tool has to be platform independent, considering many of the organizations perform their day to day tasks outside the local desktop using Citrix or Virtual machines etc. So the automation solution should be able to support any application and platform.
Interface
Next most important feature is the RPA tool’s user interface. A complex user interface will delay the process of implementation and increase the learning curve and adaptability. A more user-friendly interface like drag and drop, auto capture, image recognition etc. would be better.
Management
It is important to know how effectively and easily the robots can be managed considering these robots are going to be replacing your human workforce. There should be a high level of visibility and control in terms of process monitoring, process change, development, re-use etc.
Security
Security is one of the most important factors to be considered. How safe are the robots when compared to the humans? After all robots/RPA tools are also a piece of software, so how much more security controls can be implemented, test the code rigidly and lock it up, the better.
WORDPRESS (1)
WordPress is an open source Content Management System (CMS), which allows the users to build dynamic websites and blog.